Category: Recipes

Recipes

Chicken Korma Recipe

Is cooking meant solely to feed the body or it’s a gift to humanity to enjoy art in its purest form? Let’s make chicken korma and find it out!

As I most recently have some time, I was browsing on the internet last week. Attempting to find new, exciting thoughts, inspirational meals that I have never tasted before, to amaze my family with. Hunting for a while but couldn’t come across lots of interesting things. Right before I wanted to give up on it, I came across this delicious and simple treat by accident on Suncakemom. The dessert looked so delightful on its photo, that required urgent action.

It had been not so difficult to imagine the way it is made, its taste and just how much boyfriend might like it. Mind you, it is extremely easy to impress him in terms of desserts. Anyway, I got into the site and simply used the step-by-step instuctions which were coupled with nice snap shots of the process. It really makes life much simpler. I can imagine that it’s a slight effort to take photographs in the middle of baking in the kitchen as you may usually have sticky hands so that i seriously appreciate the time and effort she placed in to make this post .

That being said I am empowered presenting my own dishes in a similar way. Many thanks for the idea.

I had been tweaking the original recipe create it for the taste of my family. I must say it absolutely was an awesome outcome. They enjoyed the flavour, the thickness and loved having a treat like this during a hectic workweek. They quite simply requested more, a lot more. So next time I’m not going to make the same mistake. I’m gonna double the amount to keep them happy.

Thanks for SunCakeMom who made the Chicken Korma Recipe a reaility

Garam Masala

In a grinder or mortar grind all the ingredients together. Some will be content simply taking a garam masala mixture from a shop’s shelf but the purist surely will not.

Marinade

Place all the marinade ingredients, except the chicken into a food processor.

Give them a good whirl.

Mix the marinade with the meat and put it into the fridge for 30 minutes to a day. There is no rule for the type of meat we can use nor the shape but it’s advisable to cut them to fairly equal shapes so they cook evenly. In this recipe we used boneless chicken legs cut into 1″ / 2.5cm logs.

Some like to add the almond flour now instead of adding it into the sauce so it got fried with along the meat, developing additional flavors.

Sauce

Heat oil in a pan and saute the diced onions on high heat until a glassy / translucent look for about 3 – 5 minutes.

Mix in the almond flour, cardamon, black pepper, bay leaf, cinnamon, coriander and garam masala and saute it for a minute.

Add yogurt then bring it to boil.

Transfer the whole content of the pan into a food processor an process the sauce until smooth.

Assembly

Pour some oil into the saucepan and sear both side of the meat on medium to high heat until each side is golden brown for about 3 – 5 minutes.

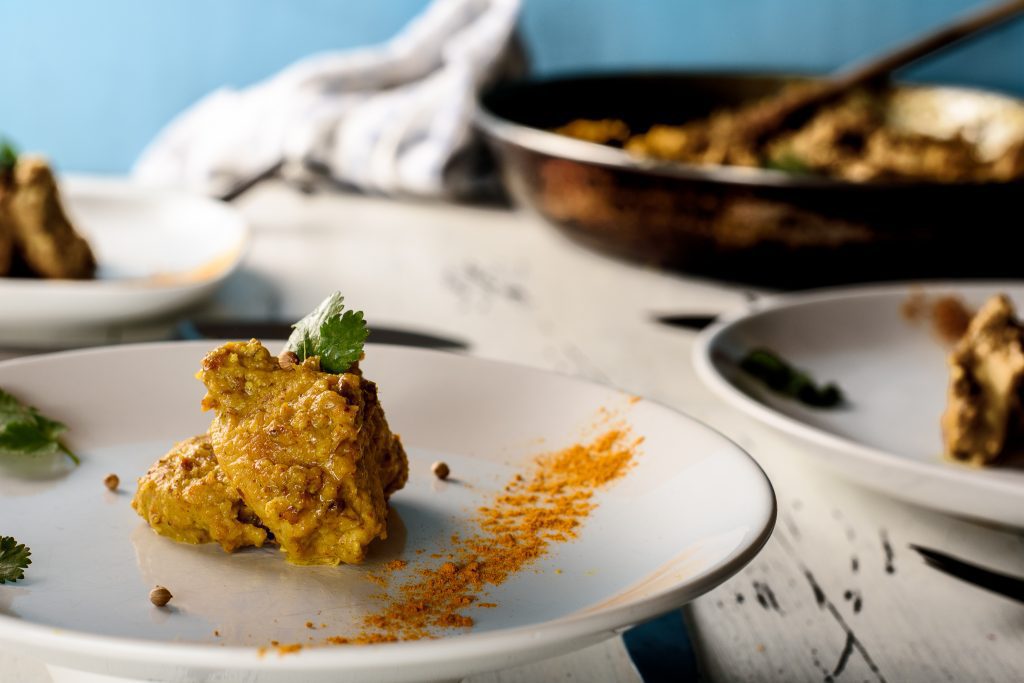
Most likely we need to do it in batches, depending on the amount of meat we are preparing. If we have done it nicely then the meat haven’t burned down so we can simply pour back the sauce in and heat together the whole chicken korma then serve it.

Avocado Brownies

Is always those who can adapt best to the new environment survives or those who can be a brownie? Let’s make avocado brownies to find it out!

As I currently have some time, I was looking on the web a few days ago. Looking to find fresh, challenging tips, inspiring recipes that I have never tasted before, to amaze my family with. Searching for a long time but could not discover lots of interesting stuff. Right before I thought to give up on it, I found this delightful and simple treat by chance. It looked so fabulous on its snapshot, that required instant actions.

It had been simple enough to imagine the way it is created, its taste and just how much boyfriend is going to like it. Actually, it is quite simple to delight him in terms of desserts. Anyhow, I got into the page: Suncakemom and simply followed the detailed instuctions that had been coupled with superb graphics of the process. It really makes life faster and easier. I can suppose it is a slight effort to take photographs in the middle of baking in the kitchen as you may typically have sticky hands so that i highly appreciate the time and energy she put in for making this blogpost .

With that said I’m inspired to present my very own dishes in a similar way. Appreciate your the thought.

I was tweaking the initial mixture to make it for the taste of my family. I have to tell you that it was a terrific outcome. They prized the flavour, the thickness and enjoyed getting a delicacy like this in the midst of a hectic week. They quite simply asked for lots more, a lot more. Hence the next occasion I’m not going to commit the same miscalculation. I am going to multiply the volume to get them pleased.

This Avocado Brownies Recipe was first published on Suncakemom.

Peel and pit avocados, crack the eggs then put all the ingredients except the chocolate chips into a food processor.

Give them a nice whirl until everything turns into a smooth and soft mass.

Fold in some chocolate chips with a spoon.

Pour the brownie batter into a parchment layered baking form. Ideally it should be a square baking sheet as brownies are supposed to be squares but round ones will do just fine too.

Bake the avocado brownies in a 360°F / 180°C preheated oven until the top sets for about 30 – 40 minutes. It will come up nicely in the oven but collapse once cooled down.

Let it cool a bit before trying to pry off the brownie from the side of the baking form.

Lasagna With Cauliflower

Why do we care more about bad things when we hate being in deep sauce? Let’s make a cauliflower lasagna and see what’s in the sauce!

As I lately have some time, I had been looking on the internet yesterday. Trying to find new, stirring tips, inspirational recipes that I’ve never used before, to treat my loved ones with. Hunting for a long time but couldn’t come across any interesting stuff. Just before I wanted to give up on it, I found this fabulous and easy treat by accident at Suncakemom. It seemed so mouth-watering on its photo, it required quick action.

It absolutely was simple enough to imagine how it’s created, how it tastes and how much my husband will probably love it. Actually, it is extremely easy to delight him when it comes to puddings. Anyway, I got into the site and simply followed the step-by-step instuctions which were combined with impressive photographs of the task. It just makes life faster and easier. I could imagine that it’s a slight effort to take snap shots down the middle of baking in the kitchen as you most often have sticky hands and so i genuinely appreciate the time and energy she placed in to build this blogpost and recipe conveniently implemented.

With that in mind I’m empowered presenting my very own recipes in a similar fashion. Many thanks for the concept.

I was fine tuning the original mixture to make it for the taste of my loved ones. I’ve got to mention it was an incredible outcome. They enjoyed the taste, the thickness and enjoyed having a sweet such as this in the midst of a lively workweek. They quite simply wanted lots more, many more. So the next occasion I’m not going to make the same mistake. I’m likely to double the quantity .

Lasagna With Cauliflower invented by Suncakemom.

Beginner

Pasta

Rice the cauliflower with a food processor or shredder.

Cook the riced cauliflower in the microwave oven on maximum settings for 2 minutes, stir then put it back for 2 more minutes. Let it cool a bit and get ready for pressing the moisture out of it.

Using a cheese cloth or simple kitchen towel, squeeze out as much moisture from the cauliflower as possible. From a small head (2lb / 1kg) cauliflower more than a cup can be squeezed out.

In a bowl mix the squeezed cauliflowers with the eggs and a bit of salt.

Spread the cauliflower dough into a parchment layered baking sheet. We need at least two layers of lasagna so choose a baking sheet that is at least double the size of our lasagna baking dish.

Place it into a 400°F / 200°C preheated ovens bottom rack until golden brown spots start to appear here and there for about 20 minutes.

Carefully take the cauliflower pasta out by the parchment paper and flip it upside down. They should be stuck pretty well together so we shouldn’t be worry about breaking it. Carefully peel off the paper from the cauliflower pasta and not the other way around.

Cut it to the size of the lasagna dish.

Sauce

At the same time we are processing the cauliflower pasta, pour some oil into a frying pan and saute the diced onion until it gets a glassy / translucent look for about 5 – 10 minutes.

Add the ground meat and brown it.

Add the tomato sauce and cook it until the tomato sauce water content reduced about at least a quarter. The whole process should take about 30 minutes.

Layering

Slice the mozzarella up.

Mix the ricotta with basil and oregano.

Assembly

Once the sauce is done, divide it into two parts and spread one half onto the bottom of a casserole dish.

Place a layer of cauliflower pasta on top.

Spread half of the ricotta and place half of the mozzarella on top too.

Repeat it again using up the the second half of the meat sauce, ricotta and mozzarella.

Place the lasagna under the broiler on maximum temperature on the top shelf until golden brown spots start to appear on the mozzarella for about 10 minutes then it’s ready to be served.

How To Make Garlic Bread

Has nature got all the answers already but we can’t see the wood from the tree? Let’s make some pull apart garlic bread and see!

As I most recently have some time, I was searching on the internet a few days ago. On the lookout for fresh, interesting thoughts, inspiring dishes that We have never tried before, to amaze my family with. Searching for quite some time but couldn’t discover lots of interesting stuff. Right before I wanted to give up on it, I came across this tempting and easy dessert by luck at Suncakemom. The dessert seemed so fabulous on its pic, it called for prompt action.

It had been not difficult to imagine how it is created, its taste and just how much my hubby will probably enjoy it. Mind you, it is very easy to keep happy the man when it comes to desserts. Anyway, I got into the site and simply followed the simple instuctions that have been coupled with great graphics of the task. It just makes life rather easy. I could imagine that it is a bit of a effort to shoot pics down the middle of baking in the kitchen because you ordinarily have gross hands so that i sincerely appreciate the effort and time she placed in to make this blogpost and recipe easily followed.

That being said I am encouraged to present my own, personal recipe in the same way. Thanks for the idea.

I had been tweaking the initial mixture create it for the taste of my loved ones. I can tell you that it was an awesome success. They enjoyed the taste, the consistency and loved getting a sweet such as this in the middle of a lively workweek. They basically requested even more, more and more. Hence the next time I’m not going to commit the same miscalculation. I am gonna multiply the volume to keep them pleased.

Many Thanks to Suncakemom for the delish How To Make Garlic Bread.

Beginner

Add the softened butter, finely chopped or crushed garlic, optional parsley and salt if unsalted butter is used into a bowl and with an electric whisk beat until the butter gets soft and creamy.

Cut the bread into ½” / 1.25cm wide slices but mind not to cut through the bottom crust, otherwise it won’t be much pulling afterwards.

Fill the slices with the creamed garlic butter.

Stuff in optional cheese.

Slice the bread the other way around too so it will make squares or diamonds. If there is some extra cheese left out, just stuff it in anywhere.

Put the bread into a 400°F / 200°C preheated oven for 10 – 15 minutes.

Apple Turnover Pie Crust

Looking for naturally sweet bite that brightens up the day? Let’s make some apple turnovers and open the door for even more!

As I currently have a little time, I had been looking on the web the other day. Attempting to find fresh, challenging thoughts, inspirational meals that We have never used before, to treat my family with. Looking for a long time but could not discover too many interesting things. Just before I thought to give up on it, I stumbled on this yummy and simple dessert by accident over Suncakemom. It looked so delicious on its photos, it called for urgent action.

It was easy to imagine just how it’s made, its taste and how much boyfriend is going to enjoy it. Mind you, it is very simple to impress the guy when it comes to treats. Yes, I am a blessed one. Or perhaps he is.Anyways, I got into the page and simply used the step by step instuctions that had been combined with impressive images of the procedure. It really makes life rather easy. I can suppose it is a bit of a effort to take photos in the middle of baking in the kitchen as you ordinarily have gross hands and so i sincerely appreciate the time and effort she devote to make this blogpost and recipe easily followed.

With that in mind I am empowered to present my own, personal recipe similarly. Appreciate your the idea.

I had been tweaking the original formula create it for the taste of my family. I’ve got to say it absolutely was an awesome success. They prized the flavour, the structure and loved having a delicacy like this in the middle of a hectic week. They basically requested more, more and more. Hence the next occasion I am not going to commit the same miscalculation. I’m likely to multiply the volume .

The original Apple Turnover Puff Pastry is provided by SunCakeMom

Filling

Place the peeled and grated apples into a mixing bowl.

The time has already come to use any optional sweetener of choice. Try to keep it low as apples are generally sweet enough and don’t really require extra sweeteners. Sprinkle the ground cinnamon on top and mix it well together.

While adding about a quarter cup of water pour the filling int a saucepan to cook. Cook apple in medium heat, stir occasionally for about 5 – 10 minutes. Replace the amount of water that evaporates if a more jucy filling is desired otherwise not necessary.

Meanwhile the apple is cooking mix a spoonful of cornstarch, teaspoon of optional vanilla extract and some water in a bowl. When added to the apple sauce this will thicken it somewhat so if we want a denser filling add more cornstarch. Optionally we can skip this step entirely.

Pour the liquid into the cooked apple mixture then stir vigorously.

Take it off the heat when it starts to boil and set aside the saucepan with the filling whilst we’re making the dough. The cooler the filling gets the better as handling buttery pastry with hot filling isn’t one of the easiest task in the kitchen.

Apple turnover dough

Measure flour, butter, baking powder and pour it into a mixing bowl with and egg. (soften or even melt the butter a bit as it will be hard to knead it otherwise)

Add the water. Water is crucial ingredient that activates gluten in the flour that holds together the whole pie from falling apart into a shapeless brown mass in the hot oil pan. Knead it well together by hand until the dough comes together and not sticking to the hands or the side of the bowl.

Divide it into nine pieces of the same size.

Make 9 little balls out of them.

Assembly

Sprinkle some flour on the board and put one ball in the middle.

Flatten it with a rolling pin then put some filling on one side of the dough.

Fold it in half. A help of a spatula may be needed to pick up the flattened dough nicely.

Press the dough together by hand or with a fork. Make sure there aren’t any gaps where the filling could escape. Remove the excess dough if necessary and make new balls from them. Repeat until the dough runs out.

Pour oil into a frying pan and heat it in medium to high heat. Drop a tiny piece of dough into the oil. If it starts sizzling, we can put the first two apple turnovers into the oil to fry. In about 1 -3 minutes (maybe more, depending on the cooktop turn it round to fry the other side too.

Cauliflower Cheese Casserole

Should we trust in our guts and eat what we like or better to err on the side of caution? Let’s make this cauliflower cheese to find it out!

As I currently have some time, I had been searching on the web yesterday. On the lookout for fresh, interesting tips, inspirational recipes that I’ve never tasted before, to treat my loved ones with. Looking for a while but could not find any interesting things. Right before I wanted to give up on it, I came across this scrumptious and easy treat simply by luck at Suncakemom. The dessert looked so scrumptious on its image, that called for instant actions.

It had been not difficult to imagine the way it is created, how it tastes and how much my husband might like it. Actually, it is rather simple to impress the man in terms of treats. Anyway, I went to the blog and followed the simple instuctions that have been combined with superb images of the process. It just makes life rather easy. I could suppose it is a bit of a hassle to shoot snap shots in the middle of cooking in the kitchen because you will often have gross hands therefore i seriously appreciate the hard work she put in to make this blogpost .

With that said I’m inspired presenting my personal recipes in a similar way. Thanks for the concept.

I was fine tuning the original recipe to make it for the taste of my loved ones. I must mention that it was an incredible success. They enjoyed the flavor, the thickness and loved having a sweet like this in the middle of a stressful week. They quite simply demanded more, a lot more. Thus the next occasion I’m not going to make the same miscalculation. I am likely to multiply the amount .

There are more Cauliflower Cheese Grills at SunCakeMom

Break the cauliflower apart into smallish florets then put them into a steamer.

Steam cook the cauliflower, which should take about 10 – 15 minutes once the water is starting to boil.

Prepare the sauce by melting butter on medium heat then add the grated cheese, mustard and cream. Add salt, pepper or any favorite spice or herbs if desired. Mind that mature cheddar is salty.

Mix everything well together.

Place the cauliflowers into an oven proof dish and pour the sauce over them. Ideally the sauce should cover all the florets.

Place the cauliflowers into a 390°F / 200°C preheated oven until golden brown spots start to appear on top for about 15 – 20 minutes.

Breakfast Fritatta Recipe

Is eating only a habit we can’t get rid of or a fundamental necessity? Let’s whip up a quick fritatta and enjoy life at its fullest!

As I lately have a little time, I was looking on the web the other day. In search of fresh, interesting ideas, inspirational meals that We have never tested before, to amaze my loved ones with. Searching for quite some time but could not come across any interesting things. Just before I thought to give up on it, I discovered this yummy and simple treat by accident over Suncakemom. It looked so scrumptious on its photo, it called for instant actions.

It had been simple enough to imagine how it’s created, its taste and just how much my hubby might like it. Actually, it is quite easy to impress the man in terms of cakes. Yes, I am a lucky one. Or maybe he is.Anyhow, I got into the site and simply used the simple instuctions that have been combined with wonderful shots of the procedure. It just makes life quite easy. I could imagine that it’s a slight inconvenience to take photographs in the midst of cooking in the kitchen as you may ordinarily have sticky hands thus i pretty appreciate the effort and time she put in to build this blogpost and recipe conveniently followed.

With that said I am empowered to present my very own recipes in the same way. Many thanks the idea.

I was tweaking the original recipe create it for the taste of my family. I have to say it turned out a great outcome. They prized the taste, the thickness and enjoyed getting a treat such as this in the middle of a busy workweek. They ultimately demanded more, many more. So next time I am not going to commit the same mistake. I am gonna twin the amount .

If you liked this Easy Breakfast Fritatta you may find more like this at SunCakeMom

Dice or slice the bacon, pancetta or lardon.

On medium heat render out the fat for about 10 minutes. Move the pieces around to avoid burning down and uneven browning.

We are going to use the rendered out fat to caramelize the onions. Add the onions and saute it on high heat for about 5 -10 minutes.

Add garlic and scallion then on medium heat fry it until the garlic gets fragrant for about 2 – 5 minutes. This is the time to add optional vegetables like spinach too. It can be added frozen, in which case at least 5 -10 more minutes of frying recommended.

Beat eggs then mix in the cream and milk. If we run out of milk or cream just substitute one with the other.

Pour the eggs mixture into the pan and add the grated cheese too.

Mix everything together then fry the fritatta on medium heat until the outer rim sets slightly. Don’t fry it on high heat! We can also just put the whole thing into the oven now as we do with crustless quiche.

Place the fritatta into the middle rack of a 400°F / 200°C preheated oven and bake it until the middle sets for about 10 minutes. If we are after some fancy look, wait for the golden brown spots too.

Cauliflower Rice

Is there a life beyond the next meal worth exploring or should we just go with the flow? Let’s make a cauliflower rice to take back control!

As I lately have a little time, I had been looking on the internet yesterday. On the lookout for new, challenging tips, inspiring recipes that We have never used before, to impress my loved ones with. Hunting for a while but couldn’t discover too many interesting things. Just before I thought to give up on it, I stumbled on this delicious and easy treat simply by chance on Suncakemom. The dessert seemed so yummy on its snapshot, it required urgent action.

It had been not difficult to imagine just how it’s made, how it tastes and how much my husband might like it. Actually, it is rather easy to delight the man in terms of puddings. Anyhow, I visited the website and then used the precise instuctions which were combined with wonderful pictures of the process. It really makes life much easier. I could suppose it’s a slight effort to take photos down the middle of baking in the kitchen as you will often have gross hands therefore i genuinely appreciate the effort and time she placed in to build this blogpost .

With that said I am encouraged to present my very own recipes in a similar fashion. Many thanks for the thought.

I had been tweaking the initial formula to make it for the taste of my loved ones. I’ve got to mention it was a terrific success. They loved the taste, the consistency and loved getting a treat such as this during a hectic workweek. They basically demanded more, many more. Thus next time I’m not going to make the same miscalculation. I’m likely to multiply the quantity .

The Cauliflower Rice provided by SunCakeMom.

Rinse cauliflower then take it into florets or simply slice it up to fit into the food processor.

Place the florets into the food processor and give them a nice whirl. They may need some adjusting until all the florets got chopped up properly.

Alternatively use a shredder that does similarly wonderful job ricing the cauliflower.

Empty the food processor and use the cauliflower rice as necessary.

Chaffles Recipe

What would life look like without waffles? They’ve come a long way from being a communion snack, even conquered the keto world as chaffles.

As I lately have a little time, I was surfing on the web the other day. Trying to find fresh, interesting ideas, inspirational meals that I’ve never tasted before, to delight my loved ones with. Looking for a long time yet couldn’t find lots of interesting things. Just before I wanted to give up on it, I stumbled on this scrumptious and simple treat by accident at Suncakemom. It seemed so tempting

on its image, that called for immediate actions.

It absolutely was simple enough to imagine how it is made, how it tastes and how much my husband will probably want it. Mind you, it is quite simple to please the guy in terms of puddings. Anyways, I visited the website and then used the simple instuctions that were combined with superb photographs of the procedure. It really makes life quite easy. I can imagine that it is a bit of a hassle to shoot photos down the middle of cooking in the kitchen as you may usually have gross hands so I pretty appreciate the time and effort she placed in to make this blogpost and recipe easily implemented.

That being said I am encouraged presenting my very own recipe in a similar fashion. Appreciate your the idea.

I had been fine tuning the main recipe to make it for the taste of my family. I must mention it was an incredible success. They prized the flavour, the consistency and enjoyed having a delicacy such as this during a lively week. They basically wanted lots more, many more. So the next time I am not going to make the same miscalculation. I’m likely to multiply the quantity to keep them pleased.

Thanks to SunCakeMom for the tasty Chaffles Recipe.

Crack the eggs and grate the cheese.

Beat everything together until fluffy.

Pour the eggs into the waffle maker. As we are making carbs free chaffles, we can’t use flour or corn starch to dust the waffle maker thickly before we pour the eggs in. As a result, we’ll have a hard time removing the chaffles without tearing them here and there. It will taste just as good but don’t invite friends with higher than average plating expectaions over for chaffle brunch.

Close the lid and fry them until the waffles are golden brown for about 10 – 15 minutes. Pry the waffles out of the waffle maker.

Moussaka Eggplant

Is lasagna really the best or should we give a chance to the unknown? Let’s make this naturally low carb Moussaka recipe and see!

As I recently have some time, I had been searching on the internet last week. In search of new, interesting ideas, inspiring meals that I’ve never tested before, to amaze my loved ones with. Looking for quite some time but could not find lots of interesting things. Right before I thought to give up on it, I came upon this tempting and easy treat by chance. It seemed so tempting

on its photo, that required immediate actions.

It absolutely was simple enough to imagine just how it is made, its taste and just how much boyfriend will enjoy it. Mind you, it is extremely simple to keep happy him in terms of puddings. Yes, I am a lucky one. Or perhaps he is.Anyways, I got into the webpage: Suncakemom and simply followed the detailed instuctions that were coupled with impressive photographs of the process. It really makes life quite easy. I could imagine that it is a bit of a hassle to take photographs in the middle of baking in the kitchen as you usually have gross hands so I highly appreciate the time and effort she put in to make this post .

Having said that I’m encouraged presenting my very own recipes in a similar fashion. Many thanks for the idea.

I was fine tuning the main recipe create it for the taste of my loved ones. I have to tell you it turned out an incredible outcome. They loved the flavor, the consistency and enjoyed getting a sweet such as this during a hectic week. They quite simply requested even more, more and more. Hence the next time I’m not going to commit the same miscalculation. I am gonna twin the quantity .

Moussaka Recipe Credit Suncakemom.

Eggplants

Cut a thin slice from the eggplant off so it will stand firmly on the cutting board.

Slice eggplants about 0.3″ / 0.75cm thick slices.

Rub salt on both sides of the slices.

Place the salted slices into a colander or any place where the moisture can drip off the eggplants for about 20 minutes.

Line a baking sheet with parchment paper and arrange the slices of the eggplant so they don’t overlap much then lightly brush them with oil.

Bake them in a 450°F / 250°C oven for about 15 minutes.

Base

Heat oil on high heat and saute the diced onions with the salt until a glassy / translucent look for about 3 – 5 minutes.

Add garlic and saute until it gets fragrant for about 1 – 2 minutes.

Mix in the ground meat.

Cook (brown) the meat until it gets an even color.

Add diced tomato, bay leaf, cinnamon and red wine.

On medium heat cook until most of the liquid evaporates for about 30 – 60 minutes.

Sauce

Bring milk and butter to boil then take it off the heat.

Beat egg yolks until light yellow then mix a couple of spoonful of milk to the yolk.

On low heat stir the yolk and the cheese back into the milk.

It should thicken up like thick cream. Take it off heat and let it cool down.

Assembly

Place a layer of eggplants onto the bottom of a casserole dish then spread the meat sauce on top.

Put on the top layer of eggplants and spread the sauce on. Sprinkle some leftover Parmesan on top.

Place it back into the 450°F / 250°C oven until golden brown spots start to appear on top for about 15 – 20 minutes.